Friday, December 18, 2009

Christmas Cupcakes

Festive Holiday Cupcakes just in time for Christmas!

Wreaths, Christmas Trees, Snow Flakes, Holly Berries, and Santa Claus all done in butter cream!

Wreath

Snow Flake

Santa Claus

Happy Holidays Everyone!

Wednesday, December 16, 2009

Golfer Birthday Cake

My father-in-law is an avid golfer, so when I was contemplating what he would be getting for his birthday this year I thought "What could be more special than to replicate him in fondant?" My husband wasn't so sure about this when I putted (ha ha) this idea to him, but he came around and gave me the thumbs up!

So I started off with the birthday man himself holding a golf club. I also made a hole & flag for the golf course and a dimpled golf ball (which is hard to see against the white Styrofoam.)


I baked a chocolate cake, and made some chocolate fudge frosting for the filling and for the sides. But since my theme was golfing, of course I covered the top in green butter cream, to create my putting green.


Outlining the green way...


And my favorite part, I added the grass with Wilton tip 233.


And for a finishing touch, added a green shell border.


Finally I placed my fondant pieces on the cake and we were ready to party!

Tuesday, December 15, 2009

Cosmopolitan Birthday

Oh how I wish I could keep up with it all. Here it is, almost Christmas and all, and I am posting pictures of cakes I made in September! I think I've used this before, but "better late, than never!"

Well, I made my wonderful best friend a fabulous cosmo cake for her birthday! I baked a half sheet cake and cut out the martini glass shape, frosted with butter cream, and garnished with some fondant accent pieces. The pictures kind of speak for themselves, so enjoy!

Yellow cake from scratch! One of the nicest parts of sculpted cake, is getting to nibble on the "left overs." YUM!

Not quite finished decorating yet.

Fondant lime and sugared rim!
As her cake design was a surprise, all she told me was that she wanted "purple" on her cake somewhere. Since, the last time I checked, cosmo's are not purple, I had to sneak it in some where.

The birthday girl LOVED the cake!

Thursday, September 24, 2009

Cupcake Brownie Burgers


I first saw this adorable dessert combo in March on Cupcakes Take the Cake, then again in June on Bakerella. I fell in love with them immediately (who wouldn't) as they are just way too cute! I knew they would be a knock out at my company's summer picnic.

My version was created by baking two dozen vanilla cupcakes, and a 13 x 9 pan of brownies. (I was being quite lazy and used box mixes for both.) After letting everything cool, I cut the cupcakes in half, and then I cut the brownie burgers out with a round two inch cookie cutter. Then I tinted some butter cream frosting red, yellow and green. I used a half cup of butter cream each for the red and yellow, and one cup of butter cream for the green. I put each color in a decorating bag, and used a round tip #5 for the red and yellow butter cream, and a rose tip #104 for the green. To assemble, I placed the bottom of the cupcake on my decorating surface, then I placed the brownie burger on top of the cupcake bottom, I piped out the red, yellow and green butter cream, and placed the top half of the cupcake on top! For a finishing touch, I moistened the top of the cupcakes with water, and sprinkled some whit non-pariels for a sesame seed look, and then placed a frilled tooth pick through the top. Viola!

They were a huge hit at the BBQ, and it think it's a pretty safe bet that these burger's would be a huge success for any occasion

Monday, August 17, 2009

Sunday Morning Brunch

Scones, Muffins & Bagels, Oh My!

So sue me, I'm a lover of carbs! I like bacon and eggs just as much as the next person, but my idea of the ultimate breakfast always includes bagels and baked goods! Some of my all time favorite treats are blueberry muffins and blueberry scones, and I love making them and serving them up warm anf fresh! And while I may not make the worlds best bagel, it is still pretty incredible, and I must say a home made bagel is worth all the effort!

Here are some pictures I have taken while making these wonderful brunch favorites, hopefully they will inspire you to get busy in the kitchen next weekend and treat yourself to a spectacular brunch!
Here is my blueberry scone dough log all ready to be cut up into the farmiliar triangular scone shape.
Here the scones have been cut, lightly brushed with melted butter, and sprinkled with a little sugar before going into the oven.

After baking in the oven, the scones cool on wire racks.
The best part, plating them up and serving them with a hot cup of coffee or tea!
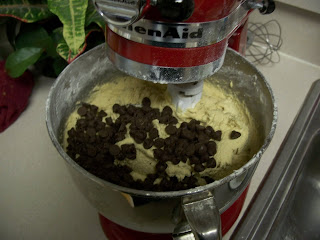
Bagel dough in the Kitchenaid mixer...
Seperating the dough...
Continuing to seperate the dough, bagel shapes are starting to come along now...
Hmmm... All the Fun Bagel Accessories...Sesame Seeds...Poppy Seeds...Dried Onion
Here, as the sun rises, so do the bagels!
I can remember the first time I read my bagel recipe, how surprised I was to find out you actually boil the bagels before baking them in the oven.
These bagels have been boiled, decorated with delicious toppings and they're ready for the oven
Fresh Bagels! Do I need to say more, I think the picture speaks for itself.
Here are the blueberry muffins just before they receive their cumbly topping and enter the oven...
And here they are baking up nice and pretty! It's a shame I didn't capture any cute picture's of them after they cooled off, I think I was too tempted to top it with butter and devour them!

Tuesday, August 4, 2009

Amy's Birthday Cake

One of my very best friends celebrated her birthday this past June (yes I am a little tardy on my post) by having a little get together with family and friends at one of our local tropical restaurants. We sat on the outdoor deck sipping umbrella drinks, enjoying coconut shrimp appetizers and dancing to the live reggae band. It was amazing! And I surprised her with a fabulous birthday cake, decorated just for the occasion. But I couldn't make her just any old birthday cake, I had to go all out! So I decided to make Tres Leches, a wonderful cuban sponge cake dessert drenched in three types of milk and topped with meringe. Then I decorated it just like a regular birthday cake!
Enjoy the photo's below...
Yellow fondant flowers. I rolled out some pre-colored fondant and used one of my small 5 point flower cutters and let them dry out for about 1 day before decorating the cake.
My gumpaste hibiscus flowers took a little more work. I tinted the gumpaste shades of orange and red. Then I rolled out the gumpaste pretty thin, and used an orchid petal cutter, which gives you the three teardrop shapped leaves. So each hibiscus has two orchid petal cut outs, for six leaves total. The first cut out is laid in the bottom of a cupcake holder, then brush the edges of the petals with gumpaste water, and then the second cut out is laid offset of the first cut out. Then I placed a stamen (non-edible) in the middle of the hibiscus and sprinkled edible glitter flakes on top for some added flair.
Next I contructed some simple palm tree's. The base of the trees are chocolate piroulines. That is easy enough! Then I rolled out some pre-colored fondant and cut out about eighteen leaves using a small leaf cutter. To get the first set of leaves to stay put on the top of the tree, I placed three leaves overlapping each other on top of the pirouline, and then I inserted a tooth pick down inside the pirouline that held the leaves in place. Then I layered more leaves on top using gumpaste water to hold them in place. They needed to dry standing up, so I placed a tooth pick halfway into a block of styrofoam, and placed the pirouline on top of the tooth pick.
Here is the Tres Leches all ready to be decorated. Ahhh, a blank canvas. Not for long!
I piped a pink buttercream shell border around the edges, and sprinkled some brown sugar for a sand effect.
Then came the real fun! I added the palm trees, hibiscus flowers, yellow flowers, and more brown sugar sand to create an edible tropical paradise!
An up close shot of the hibiscus flowers...
And finally to complete the cake, I piped a Happy Birthday message in more pink buttercream!

Friday, July 17, 2009

Chocolate Chip Cookie Contest

Every quarter we have a division luncheon where everyone gets together to discuss recent issues, future events etc. And at our most recent luncheon I suggested we have a cookie contest for the dessert. Since I was in charge of the cookie contest, everyone who wanted to participate was supposed to send me their name and what kind of cookie they were entering. I collected about four entries and no one had submitted chocolate chip! Can you believe it. So I decided to make my chocolate chip recipe to balance out the competition!

I just love my mixer in action. Not only does it making baking easier, it's just more fun!

Hmmm, adding the best part, the chocolate chips!

That's A LOT of cookie dough! I doubled the recipe so I would have plenty of cookies to go around.

I took four dozen cookies in for the contest, and kept about a dozen at home for us :)
The results came in..........drum roll please...... I didn't win :(
Actually, the winning cookie was fabulous! It was a small chocolate cookie with a chocolate covered cherry baked into the center. Very delicious! Oh well, there is always next year!

Tuesday, June 23, 2009

Odds & Ends Baking

So I have been quite the busy baker bee since my last post. And I thought I would start off with a bang by doing a collage posting of several different things I have made over the last three months.

Here goes...

First, for Mother's Day we had our families over for a nice Sunday afternoon BBQ. I decided Cheesecake sounded like a real winner. So I pulled out an old favorite, Raspberry Swirl Cheesecake with Chocolate Crust and Raspberry Sauce. It was the perfect ending to Mothers Day. I only got one photo (which wasn't even that good) because there were a lot of people starring me down, waiting for their slice.

Next, Mini Brownie Bites, just because Brownies rock! I had bought these really cute mini muffin pans on sale, and hadn't really had the chance to use them. And Brownies are just one of those foods I crave, do you know what I mean? So I mixed up a batch and baked them up in my mini tins and then let them cool on the rack. Once they were cool I just looked at them and thought they are so adorable, they deserve a little decoration. I mixed up a quick batch of chocolate butter cream and piped it on top with my 1M tip and that's all she wrote. Added Bonus - They went perfectly in our lunch boxes for the next few days!
Here we have my husband's coworkers 40th birthday cake. Did I have any advance notice of this birthday so I could properly plan? Nope. I baked, iced and decorated this thing after I came home from work at around 5 o'cock and had it ready to go to work the next day by about 10 o'clock. (Thank goodness for those "buy one get one" cake mixes I stock up in my pantry.) This included coming up with the idea itself. It needed to be funny, but not too cliche, but not too offensive either. Did I already mention I had no notice to come up with this... So I turned to old faithful, the internet, for idea's and I actually got this idea from a picture of a greeting card I came across. It's not fancy, but it's funny, and that was all they really needed, a good laugh about getting old and a big slice of cake!

Finally, my experiment with rainbow cupcakes. Right before I was abducted away from the blogging world, I was seeing these rainbow cupcakes popping up everywhere! And I loved them, who wouldn't? I regret that I do not have tons of photo's of me making these, but I could have used four hands just to make these things alone. I would have needed a fifth hand to take pictures. I didn't have a special occasion in mind, just a hankering for some cupcakes, and to try out some new sprinkles I had just purchased.
So I mixed up the batter as I would for any cupcakes, and then I got out four of those disposable plastic bowls by gladware or ziplock or whoever. I divided up the batter in four parts and then colored them yellow, green, blue, and pink. I highly recommend the first time you make these to not try anymore than four colors. Four colors is PLENTY to work with, don't complicate it with six, its just not worth it! Next, I filled four half-gallon size disposable bags with my colored batter, snipped off the ends and filled the cupcake papers. Gosh, that sounds so easy! Here's a nifty tip, batter is extremely runny, and icing is usually not, batter does not act like icing in a piping/disposable bag! Instead batter just keeps running out of the bag :) So if you want this cool rainbow effect, you have to be very crafty, and have helpers on hand to hold the bags that you have opened while you fill cupcake tins with a different color batter. This isn't so hard as long as you bribe helpers with cupcakes. Like I said before, I could have used four hands for this project.
And here they are all baked up and split open for you viewing pleasure. So go ahead and try making some, they are lots of fun to make and to eat, but be ready for a mess! (Like there isn't always a mess to clean up afterwards anyways.)

Thursday, June 18, 2009

Back into the swing of things!

This blog was my New Years Resolution back in January, and I did so well for 3 months straight. And now here I am, 3 months in a row with no posts! It's funny becuase I think about posting all the time, but I just can't find the time to sit down and just do it! I am still baking and photo documenting my creations, so do not fear, I think the guilt of ignoring my blog for so long is finally starting to sink in!

My goal this weekend is sit down and start flooding my blog with new posts, so stay tuned everyone, my cake thoughts are about to start pouring out of my head and back onto the blog! :)

Friday, March 27, 2009

March Birthday Cake Madness!

My husband, and both of my maternal grand parents, all have March birthdays. So seeing as how I have been in a constant time pinch lately with my new job, and family obligations, and life in general, I was barely able to find the time make and decorate their cakes. In other words, I am lacking in my normal amount of photo journaling baking photo's. At least I was able to get some pictures of the finished products prior to them being devoured!


This was my husbands birthday cake. I asked his opinion about what he would like, and he said "I don't know, chocolate?" OK, you want chocolate, you got it! Devils food chocolate cake, with chocolate butter cream filling, coated with chocolate gnash frosting, and decorated with more chocolate butter cream!


My grandparents on the other hand, well I took it a little easier on them. My grandpa is diabetic and he really shouldn't be having cake as it is, but on your birthday your deffinatley entitled to some cake. So I went with a simple french vanilla white cake, and filled, frosted and decorated with vanilla butter cream. And to tell you the truth, were all so chocolated out from my husbands cake the week prior, the vanilla cake was a welcome change!